How to move a WordPress site to a new domain
Moving a WordPress site to a new domain means changing its primary web address, a common step during rebranding or a strategic shift.
Incorrectly moving a website can have serious consequences, such as data loss, broken functionality, and a significant drop in your search engine rankings.
Here’s a quick look at how to move your WordPress site to a new domain:
- Secure your data. Start by creating a complete backup of your website’s files and database to prevent any data loss during the transfer.
- Copy your database. Export the entire database, which contains all your posts, pages, and user information, preparing it for the new location.
- Relocate your files. Upload the backup of your website’s core files to the server associated with your new domain name.
- Set up the new database. Create a new, empty database on your new hosting account and import the data you exported earlier.
- Update database URLs. Change the site URL references within the newly imported database to reflect your new domain name.
- Configure WordPress. Edit the wp-config.php file to connect your WordPress installation with the new database.
- Repair internal links. After the move, scan your site for any internal links still pointing to the old domain and update them.
- Redirect traffic and bots. Implement 301 redirects to automatically send visitors and search engine crawlers from your old domain to the new one.
- Inform Google. Use Google Search Console to officially notify the search engine that your site has moved to a new address.
1. Back up your WordPress website
Before migrating your WordPress site, the first and most critical step is backing up all your site’s files and its database. This gives you a complete, working version of your site that you can restore if anything goes wrong during the migration, preventing any data loss.
There are several ways to back up your WordPress site, including using a plugin or the backup tools provided by your hosting provider. The goal is to download a full copy of your site’s public_html directory and a separate file for your database.
2. Export the WordPress database
After backing up your files, you need to export the database from your old hosting account. You can typically do this using phpMyAdmin, a popular database management tool available in most hosting control panels.
The process involves selecting your database in phpMyAdmin, choosing the export function, and saving it as an SQL file. For a step-by-step guide, see our tutorial on how to export your MySQL database using phpMyAdmin.
3. Upload your WordPress files to the new domain
With your website files backed up and saved to your computer, the next step is to upload them to your new hosting account.
This will place your WordPress core files, themes, plugins, and media uploads into the root directory of your new domain, typically the public_html folder.
You can upload your website files using your new host’s File Manager or an FTP client like FileZilla. The transfer might take some time, depending on the size of your website.
4. Import the database to the new hosting environment
After uploading your files, you need to import your WordPress database into the new hosting environment.
First, create a new, empty MySQL database in your new hosting account’s control panel. You’ll need to set a database name, a username, and a password – be sure to save these details for a later step.
Once the new database is ready, use phpMyAdmin in your new hosting account to import the SQL file you exported earlier. This will populate the new database with all your old site’s content.
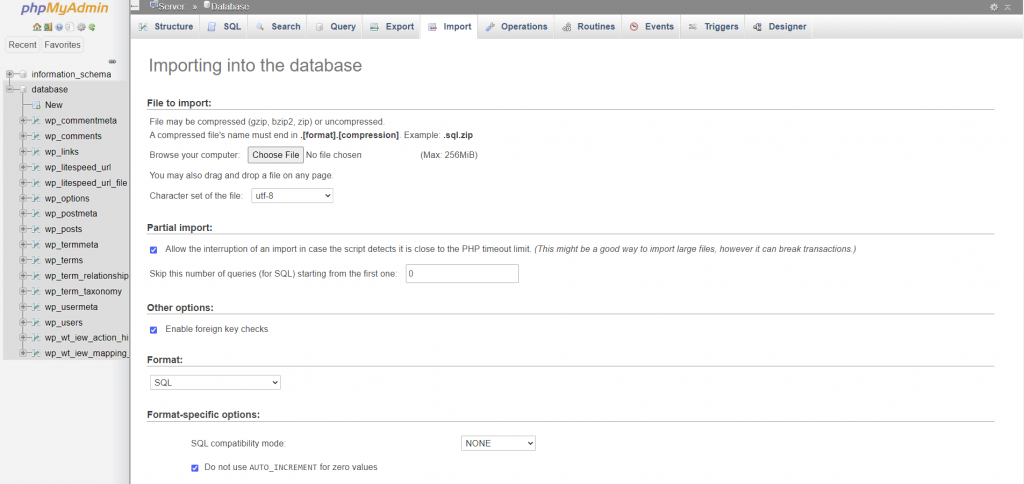
You can find detailed instructions in our guide on how to import a database with phpMyAdmin.
5. Update the website URL in the database
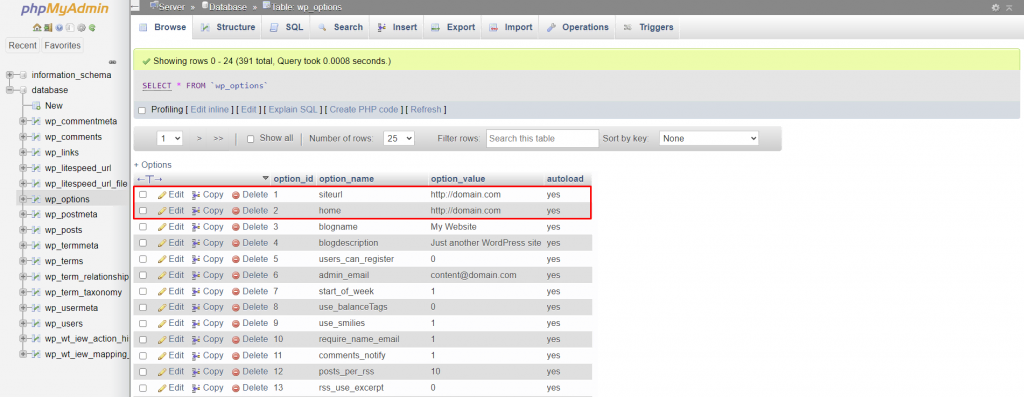
Your imported database still contains URLs pointing to your old domain name. You’ll need to change these WordPress URLs in phpMyAdmin to your new domain for WordPress to work correctly.
To do so, simply locate the wp_options table of your new database, find the siteurl and home rows, and replace the old domain with the new one.
6. Update your wp-config.php file
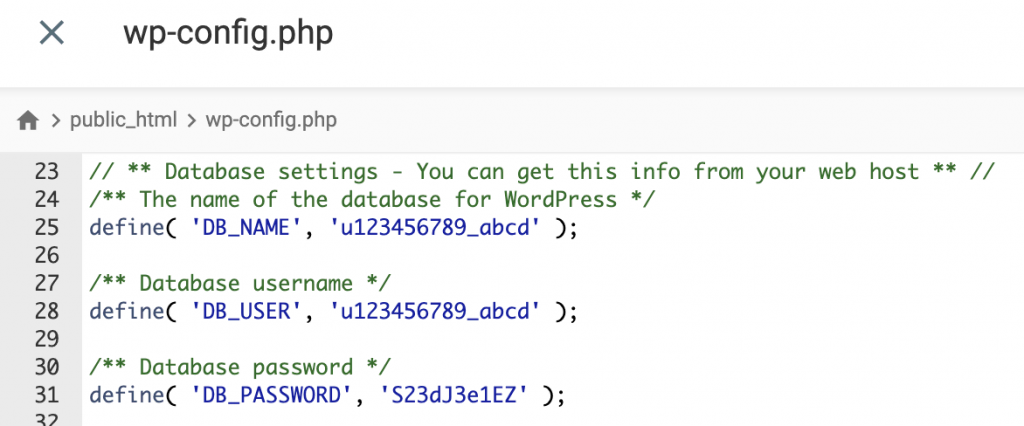
The wp-config.php file contains the database connection details for your WordPress site. You must update this file to connect WordPress to your new database. If you don’t, your site won’t be able to access its content.
Find the wp-config.php file in the root directory of your new domain and edit the DB_NAME, DB_USER, and DB_PASSWORD values to match the new database credentials you created earlier.
define('DB_NAME', 'new database name');
define('DB_USER', 'new database username');
define('DB_PASSWORD', 'new database password');
This critical step finalizes the connection between your WordPress files and their content.
💡 Pro tip
If you prefer to update the wp-config.php file using a text editor instead of File Manager, download it via an FTP client and re-upload it to the root folder once you update it.
7. Fix broken links
Now that you’ve migrated your site, you may find that some internal links still point to your old domain, leading to 404 errors. These broken links can harm user experience and your site’s SEO.
It’s important to find and update all hardcoded URLs in your posts, pages, and widgets.
While you can fix broken links on your new WordPress site manually, it’s much more efficient to use a plugin like Update URLs or Better Search Replace. These tools scan your entire database and replace all instances of your old domain with the new one.
8. Set up 301 redirects from your old domain
To preserve your SEO rankings and guide users to your new site, you must set up 301 redirects. This type of redirect permanently forwards traffic from an old URL to a new one, telling search engines that your content has moved.
This passes along the link equity from your old domain to your new one.
It’s a crucial step for maintaining your site’s authority and helping visitors who use old links or bookmarks land on the correct page. You can set these up by editing your site’s .htaccess file or using a redirection plugin.
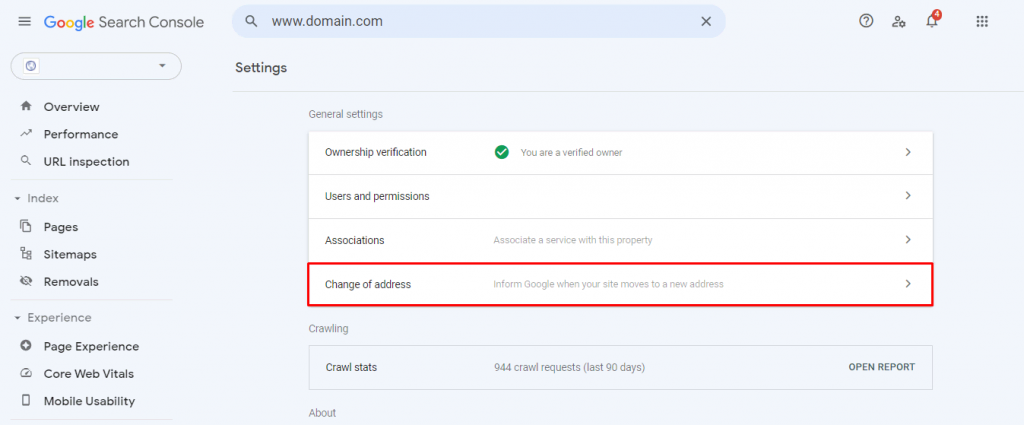
9. Update your Google Search Console
Finally, you need to inform Google about your domain change. This helps Google update its index faster and lets your new domain appear in search results without a long delay.
Before you start, make sure you have verified both your old and new domains in Google Search Console. Once both domains are verified, navigate to Settings → Change of Address to submit your request for the domain change.
🤝 Migration assistance
If you wish to switch to Hostinger but prefer not to do it manually, we have a migration team that can assist you. You only need to send us a request for website migration.
How to move a WordPress site from a subfolder to the root URL
Moving a WordPress site from a subfolder to the root URL means changing its address from a subdirectory, like domain.tld/wordpress, to the main domain – domain.tld.
This process is much simpler than a full domain migration because you aren’t changing hosting providers or domain names.
The main difference is that you are only repositioning the files on the server and updating WordPress settings, not migrating the database to a new location.
Here’s what the process looks like compared to migration to a new domain:
- Relocate your site’s files. Instead of uploading files to a new server, you’ll move them from the subfolder to your site’s root directory (the public_html folder) on the same server.
- Update the site address in WordPress. After moving the files, log in to your WordPress dashboard and navigate to Settings → General. Update the WordPress Address (URL) and Site Address (URL) fields to reflect the new root URL.
- Reset your permalinks. The move can cause your site’s links to break. To fix this, go to Settings → Permalinks and click Save Changes without making any edits. This action regenerates your .htaccess file with the correct paths for the new location.
Unlike a full domain migration, you don’t need to create a new database or edit the wp-config.php file’s credentials.
How to maintain SEO health after a WordPress migration
To maintain SEO health after a WordPress migration, you must strategically manage the transition to protect your search engine rankings, organic traffic, and domain authority.
Your site’s SEO stability hinges on how well you implement redirects, update internal links, and prompt search engines to reindex your site.
Here are the most important actions to protect your WordPress site’s SEO:
- Verify all traffic is rerouted. Use a crawling tool like Screaming Frog to confirm every old URL has a 301 redirect pointing to the correct new page. Avoid redirect chains or mapping all old pages to the new homepage.
- Prompt search engines to crawl the new site. Generate a new XML sitemap that includes all your new URLs. Submit this sitemap to Google Search Console to accelerate the discovery and indexing process.
- Watch for technical issues. Monitor your Google Search Console account closely for several weeks. Look for 404 errors, redirect issues, or other crawlability problems and resolve them promptly to prevent negative SEO impacts.
- Reclaim high-value backlinks. While you can’t change every backlink, identify your most authoritative ones and contact the site owners to ask them to update the link to your new domain. This helps pass link equity directly.
By following these steps, you can carry over your hard-earned SEO performance to your new domain.
All of the tutorial content on this website is subject to Hostinger's rigorous editorial standards and values.

Jordana is a Senior Content Writer with a background in Information Systems. She has over five years of experience in WordPress and is casually dabbling with PHP and MySQL. Her passion for writing and technology drives her to create tutorials for anyone wanting to build their online presence. Follow her on LinkedIn.

Ariffud is a Technical Content Writer with an educational background in Informatics. He has extensive expertise in Linux and VPS, authoring over 200 articles on server management and web development. Follow him on LinkedIn.


